


https://zh.wikipedia.org/wiki/%E6%AD%BC-10
11 15 16 20 35 22
1 | defaults write com.apple.dock persistent-others -array-add '{ "tile-data" = {"list-type" = 1; }; "tile-type" = "recents-tile";}' && \killall Dock |
手机扫描二维码 藏在 设置 - 已关联设备
将 Signal Desktop 与手机关联的步骤:
安装并打开 Signal Desktop。
在你的手机上,打开信速达转到信速达的设置界面profile_avatar.png > 登录过的设备。
按下+图标(安卓)或是”登录新的设备”(苹果)
用你的手机来扫描二维码。
选取一个你登录过的设备然后点击完成。
从 Signal Desktop 发送一条信息。
1 | var numbers = [15.5, 2.3, 1.1, 4.7]; |
1 | var numbers = [15.5, 2.3, 1.1, 4.7]; |
1 | <div id="parent"> |
in main.js
1 | export const bus = new Vue() |
in Parent.vue:
1 | import {bus} from 'path/to/main' |
// Where you wanna call the child’s method:
1 | bus.$emit('customEventName', optionalParameter) |
in Child.vue:
1 | import {bus} from 'path/to/main' |
// Add this to the mounted() method in your component options object:
1 | bus.$on('customEventName', this.methodYouWannaCall) |
1 | import ChildForm from './components/ChildForm' |
组件代码
1 | <template> </template> |
组件内,返回 除 class style props 以外的 其他属性
1 | console.log(this.$attrs); |
1 | console.log(this.$root.$children[0].$children[0].$data); |
$createElement:
$el:
$listeners:
$options:
$root:
$scopedSlots:
$slots:
$vnode:
$on 的事件可在 created 或 mounted 注册
需在 beforeDestroy 或 destoryed 的时候使用用 $off 销毁
否则在某些情况下会被被多次触发
this.EventBus.$off(‘map_is_ready’);
全部 cancel
this.EventBus.$off();
vue.config.js 中添加
1 | module.exports = { |
本机域名 在
/etc/hosts
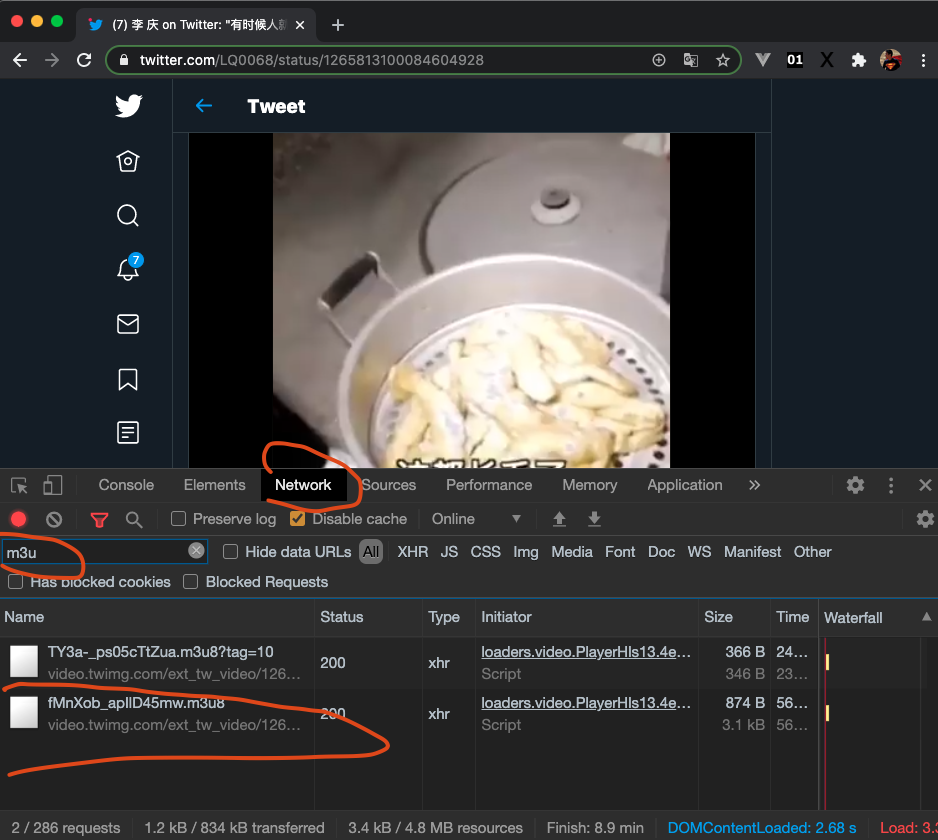
比如这个页面: https://twitter.com/LQ0068/status/1265813100084604928
打开 Inspect - Network 控制面板
搜索 m3u ,找到 m3u 地址
在 bin 目录,执行命令
./ffmpeg -i https://video.twimg.com/ext_tw_video/1265812939941965825/pu/pl/320x458/fMnXob_apIlD45mw.m3u8 1.mp4
参考:
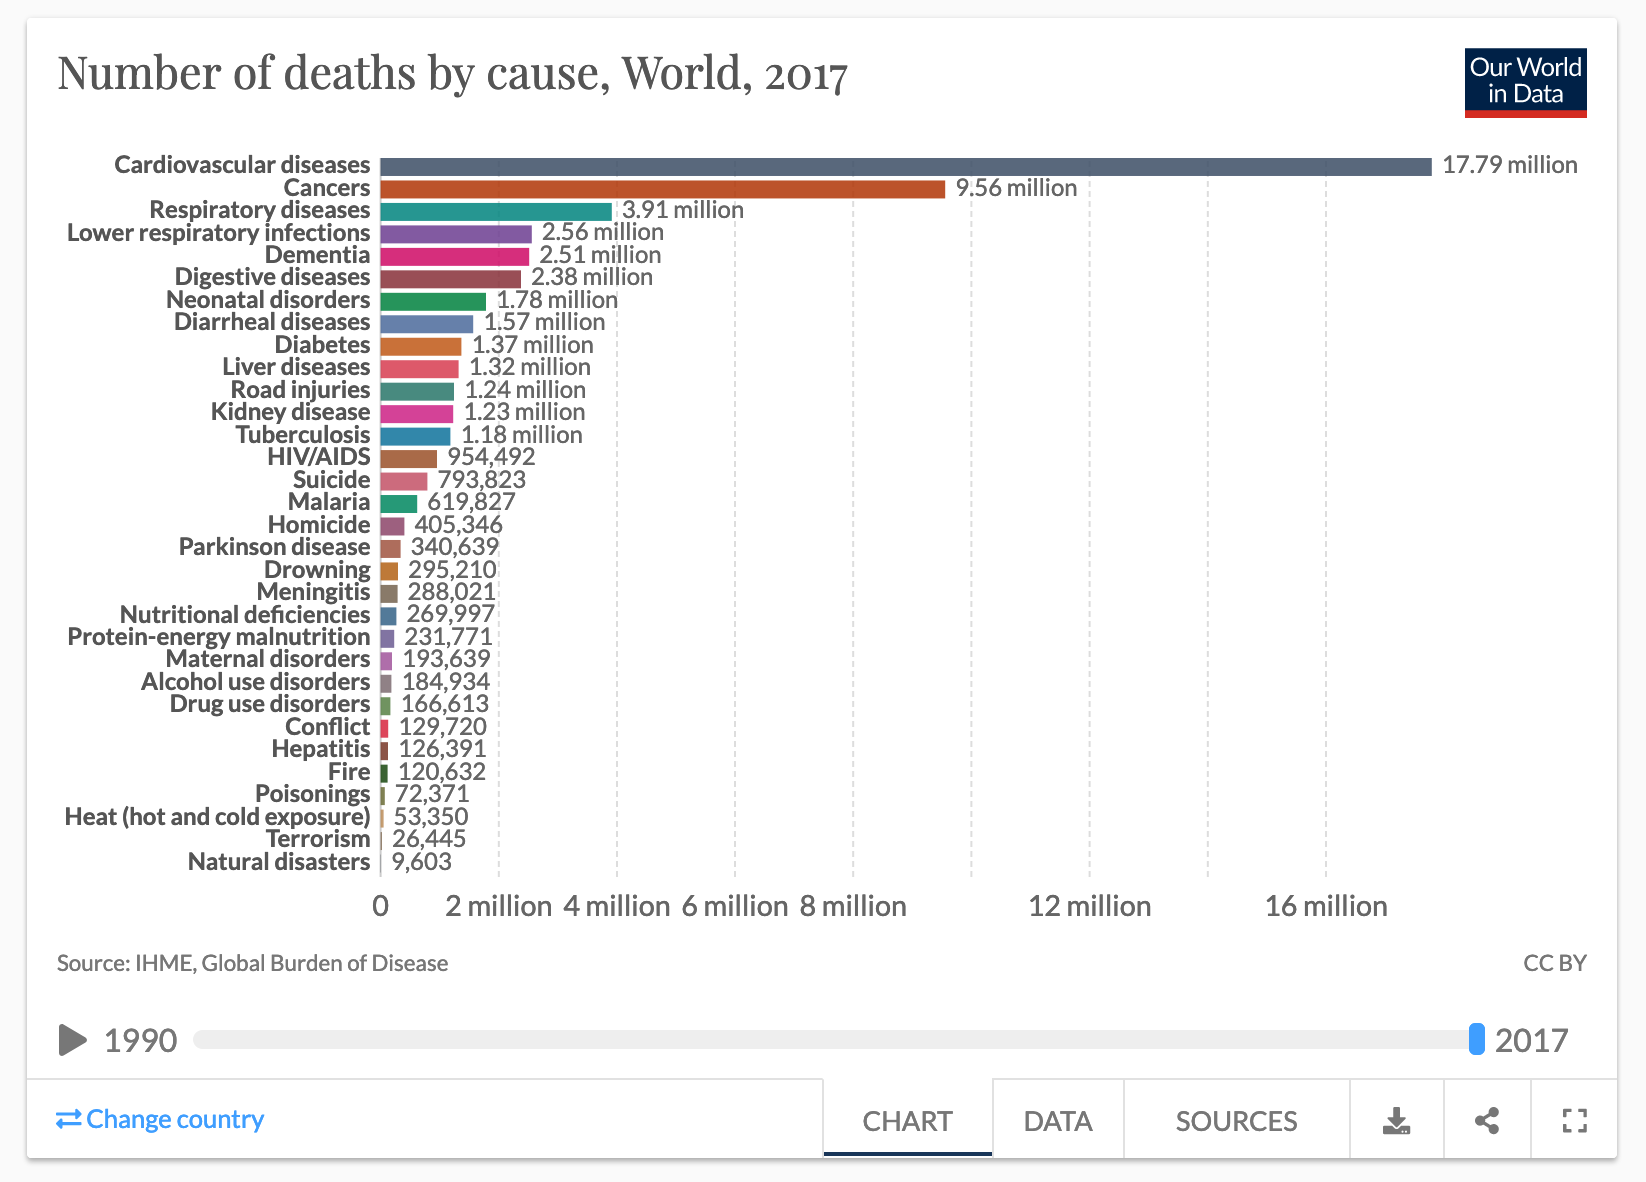
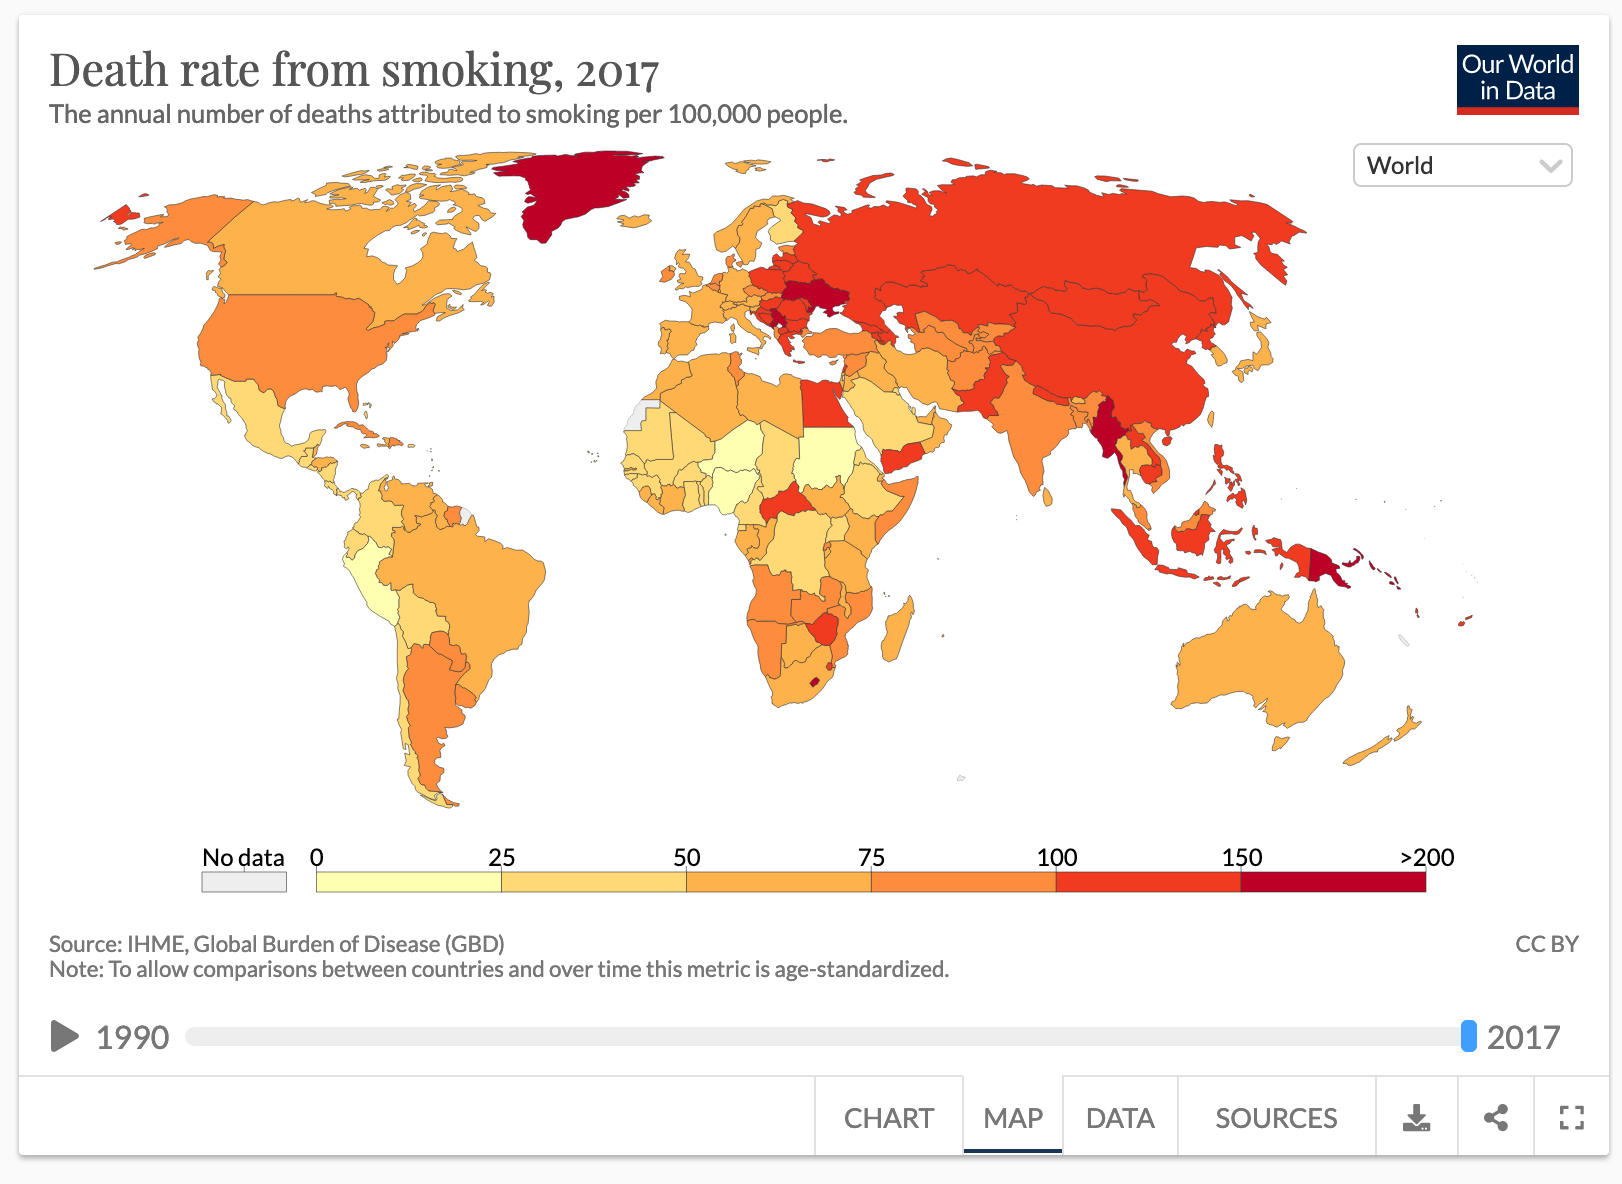
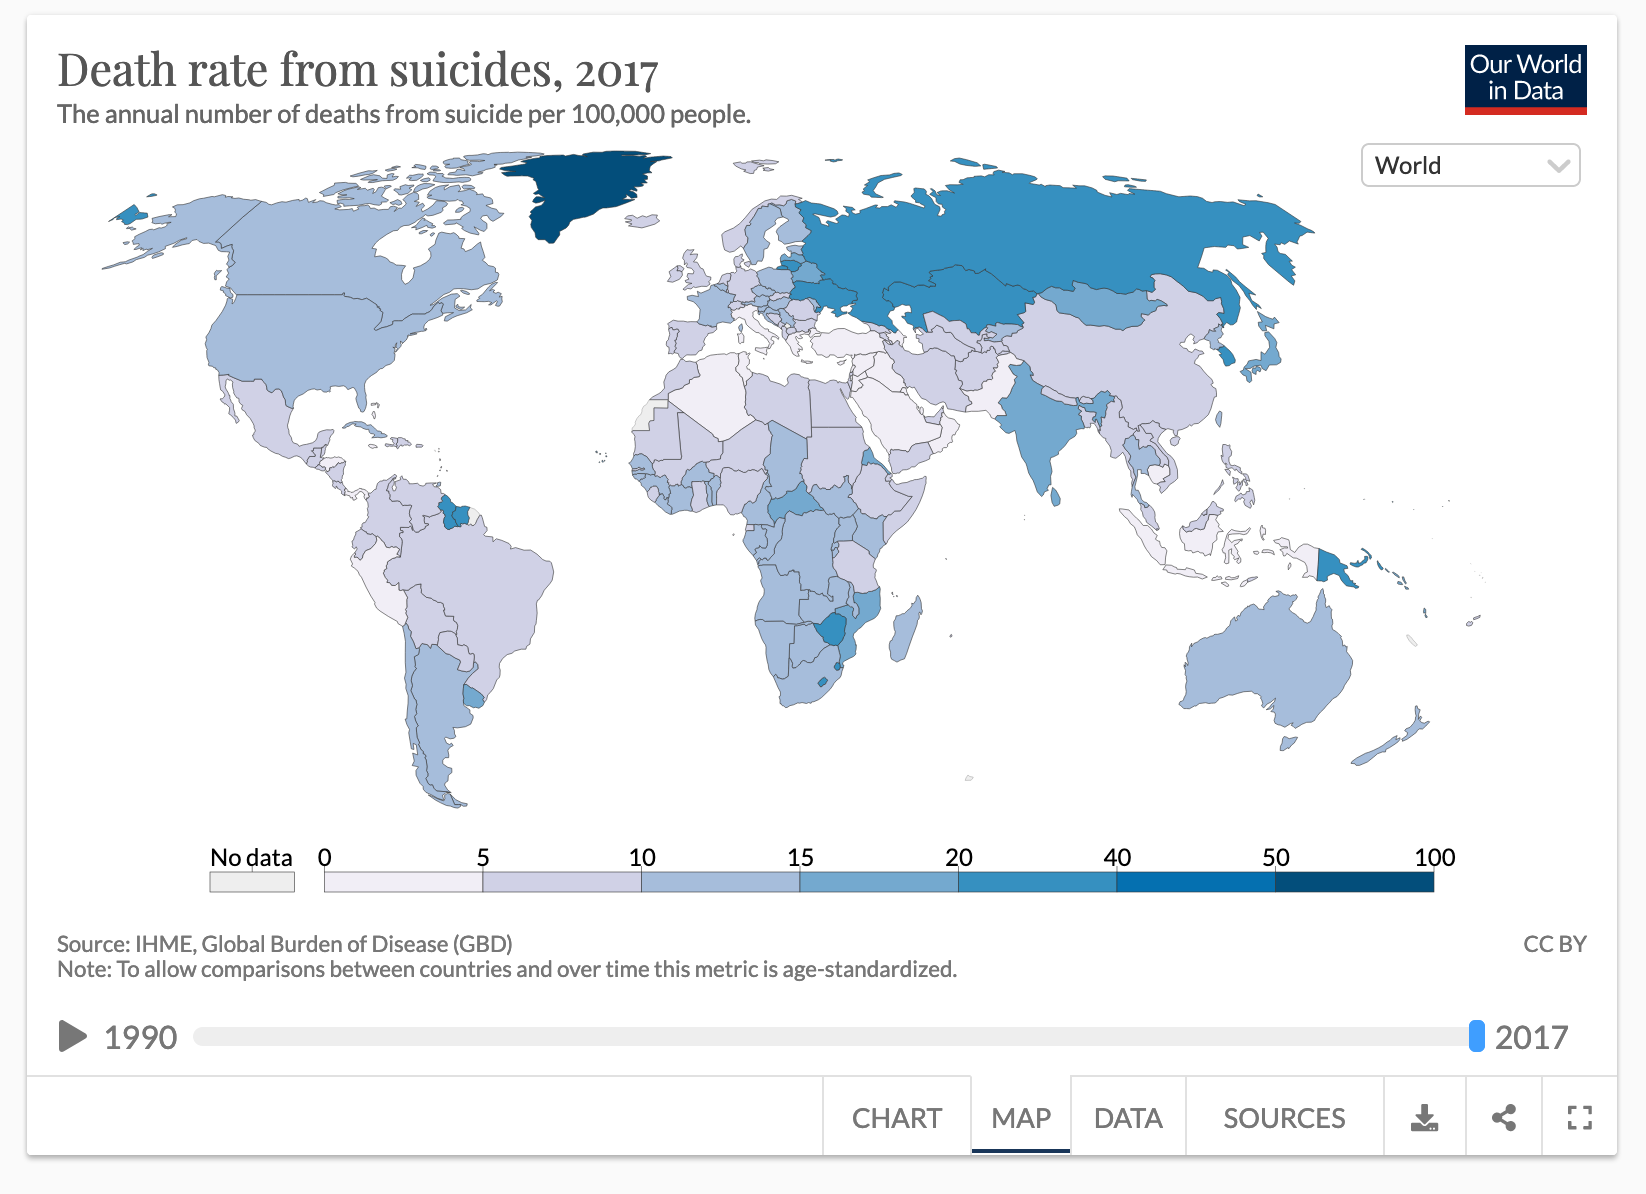
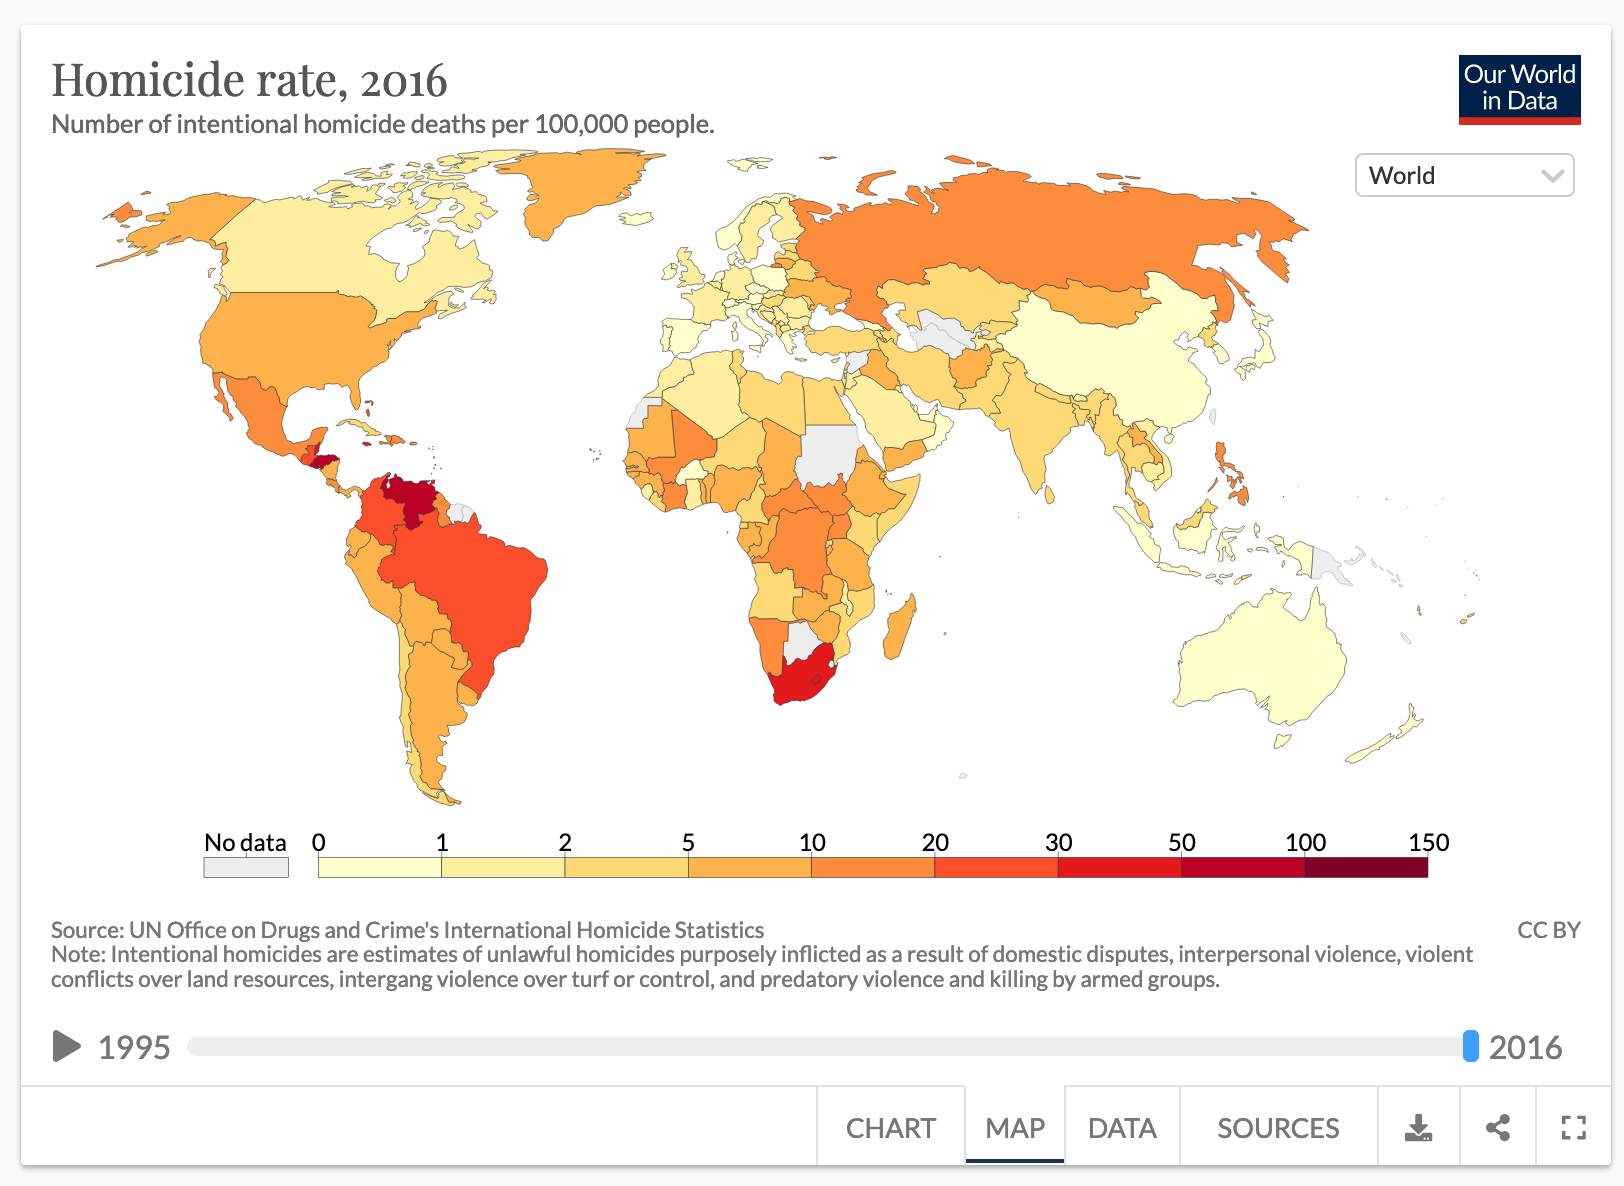
cardiovascular | 心血管的
cancer | 癌症
respiratory | 呼吸的
low respiratorty infection | 低呼吸道感染
demential | 痴呆的
digestive | 消化的
diabet | 糖尿病
liver | 肝
road injuries | 道路伤害
kidney disease | 肾脏疾病
tuberculosis | 结核
HIV/AIDS | HIV爱滋病
suicide | 自杀
malaria | 疟疾
homicide | 杀人
parkison | 帕金森
drowning | 淹死
meningit | 脑膜炎
nutritional deficiencies | 营养不足
protein-energy malnutrition | 蛋白质能量营养不良
maternal disorder | 产妇疾病
alcohol use disorder | 饮酒障碍
drug | 药品
conflict | 冲突
hepatities | 肝病
fire | 火
poisoning | 中毒
heat | 热
terrorism | 恐怖主义
natural disaster | 自然灾害
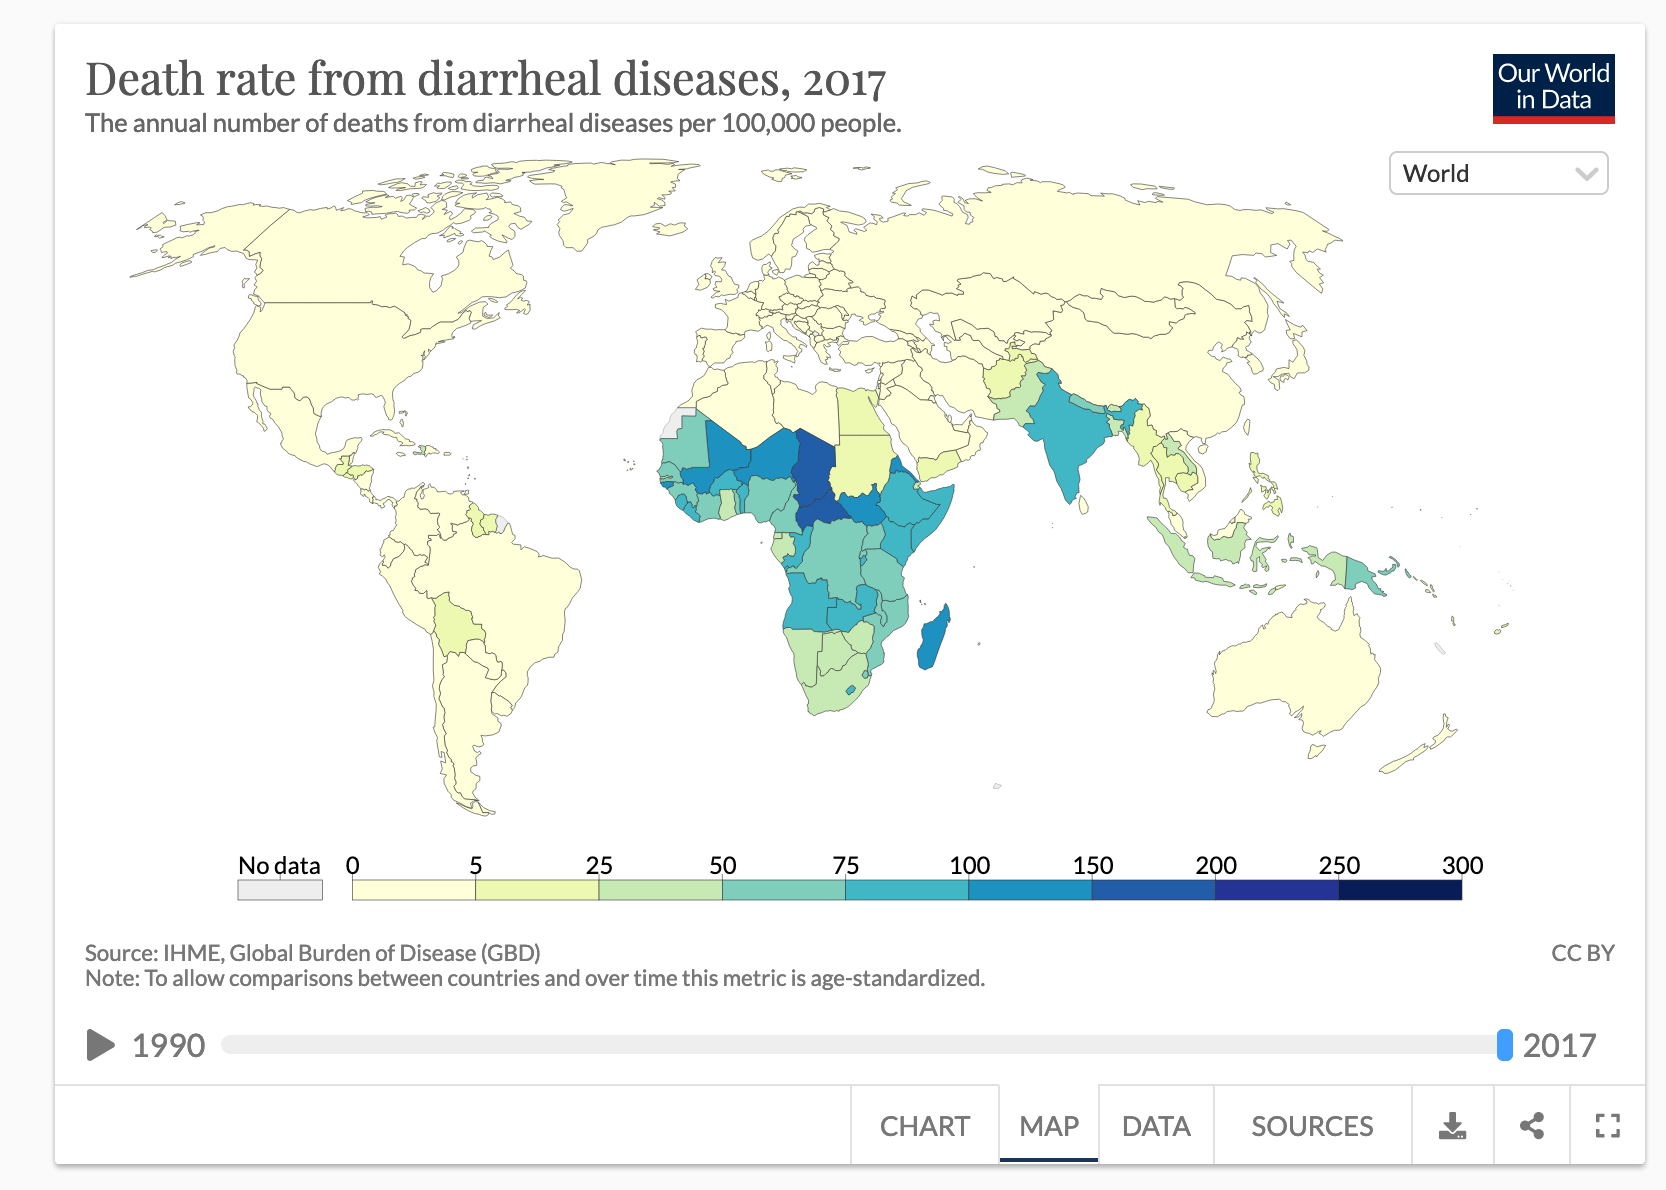
Diarrheal | 腹泻
Cardiovascular | 心血管的
Dementia | 痴呆
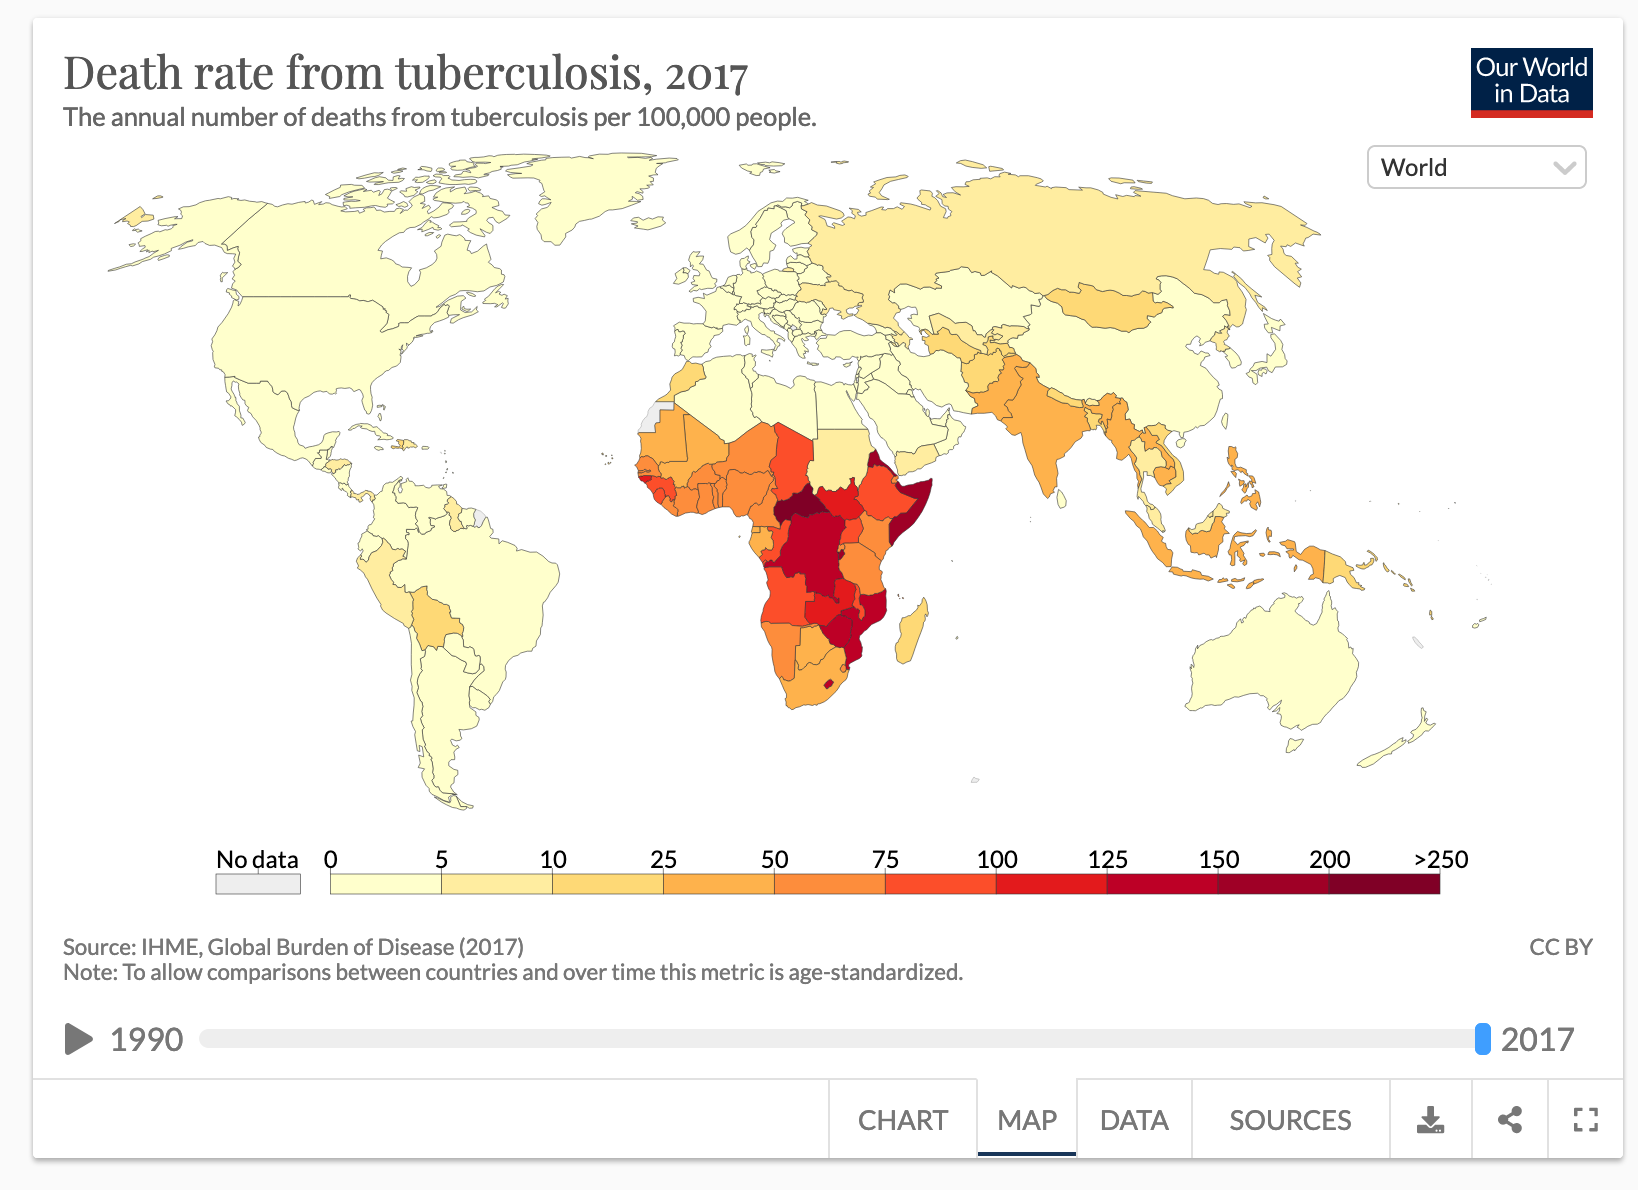
Tuberculosis | 结核
1 | <h3>type=radio 的只读问题</h3> |
iOS 13 开放了 NFC 标签读取功能,你的 iPhone 还能这么玩
具体操作
捷径 > 自动化 > 点击右上角 + 号 > 创建个人自动化;在弹出的动作选项「设置」分类下,找到「NFC」;点击「扫描」,将手机靠近 NFC 标签,建议贴紧;设备检测到 NFC 后弹出标签命名框,为标签命名,保存;选择读取 NFC 标签后的下一步操作,例如拨打电话、打开 WiFi、播放音乐等;去掉「运行前询问」的勾选,这是非常影响体验的关键步骤,如果运行前还要在手机上确认的话,NFC 标签的智能化就大打折扣了。
有,iphone6s怎么使用nfc功能教程
首先我们在手机打开桌面的——-【系统设置】功能键。
接着在常用选项栏目或全部选项下方查看,各个手机界面有所不同。
通常情况带有NFC功能的手机多见于内置在【无线网络】或WiFi的【更多。。。】子栏目下。
进入无线和网络更多。。栏目后就可以看见NFC功能的开启按钮了。
向右滑动即可打开NFC功能。
打开NFC按钮后点击进入NFC设置面页——【勾选】相应的模式即可。
开启NFC功能后,不仅能和另一部支持NFC的手机相互传送文件,还可以使用支持NFC芯片的公交卡、地铁、刷卡、支付宝读取等功能。前提是你所在的地方运营商已经支持NFC应用。
nfc功能目前只支持apple pay,苹果支付,没有其他意义
###iphone 用 NFC 标签配合快捷指令实现场景自动化

分别是 NFC 卡片(有圆形也有矩形)、NFC 贴纸和 NFC 滴胶卡。我个人比较推荐的是后两种——贴纸和滴胶卡,它们在使用上会更灵活,贴纸可以贴在家里的任意位置2 ,滴胶卡则方便随身携带。这些 NFC 标签都非常便宜,每个在 1 块钱左右,有的还能定制外观。
iPhone 支持扫描多种 NFC 标签,包括比较流行的 NTAG、MIFARE、ICODE 等。我购买的是 NTAG 系列的标签,在淘宝等电商平台上也比较好购买。其中 NTAG 标签有 213、215、216 等型号,主要区别是储存容量的大小,一般买最小的 213 就足够使用。
Open browser on scan of NFC tag in Android
That is because you are writing a text record with the text “http://www.google.com" to the tag. NFC devices usually do not know how to interpret text on tags (though they could just display that text – and some devices do exactly that).
What you want to do is create a record based on the NFC Forum’s URI Record Type Definition. The createRecord method could look like this:
1 | private NdefRecord createRecord(String uri) throws UnsupportedEncodingException { |
Or you could just use Android’s built-in method:
record = NdefRecord.createUri(“http://www.google.com");
Regarding the detection on other devices: Using a MIFARE Classic tag on the S3 should work. The S4 (and any other device based on Broadcom’s NFC chipset) does not support MIFARE Classic at all, so you would need to switch to another tag technology to support those devices.
NFC标签上的URL与NFC标签上的纯文本消息不同。它们具有不同的消息类型。您的清单中列出了2个用于纯文本消息的意图过滤器(实际上不会触发最后一个过滤器,TAG_DISCOVERED意图将永远不会包含来自标记的任何数据)。
要匹配示例网址,请尝试:
1 | <intent-filter> |
height: 100vh = 100% of the viewport height
height: 100% = 100% of the parent’s element height
That is why you need to add height: 100% on html and body, as they don’t have a size by default
Something you have to know : if you use % for vertical margin or padding, % will be calculated on the width of the parent element, not the height.
Tip : try using vh and vw units for font size :) I like this one (not supported in some browsers I know) : font-size: calc(.5vh + .5vw); (for example)