0%

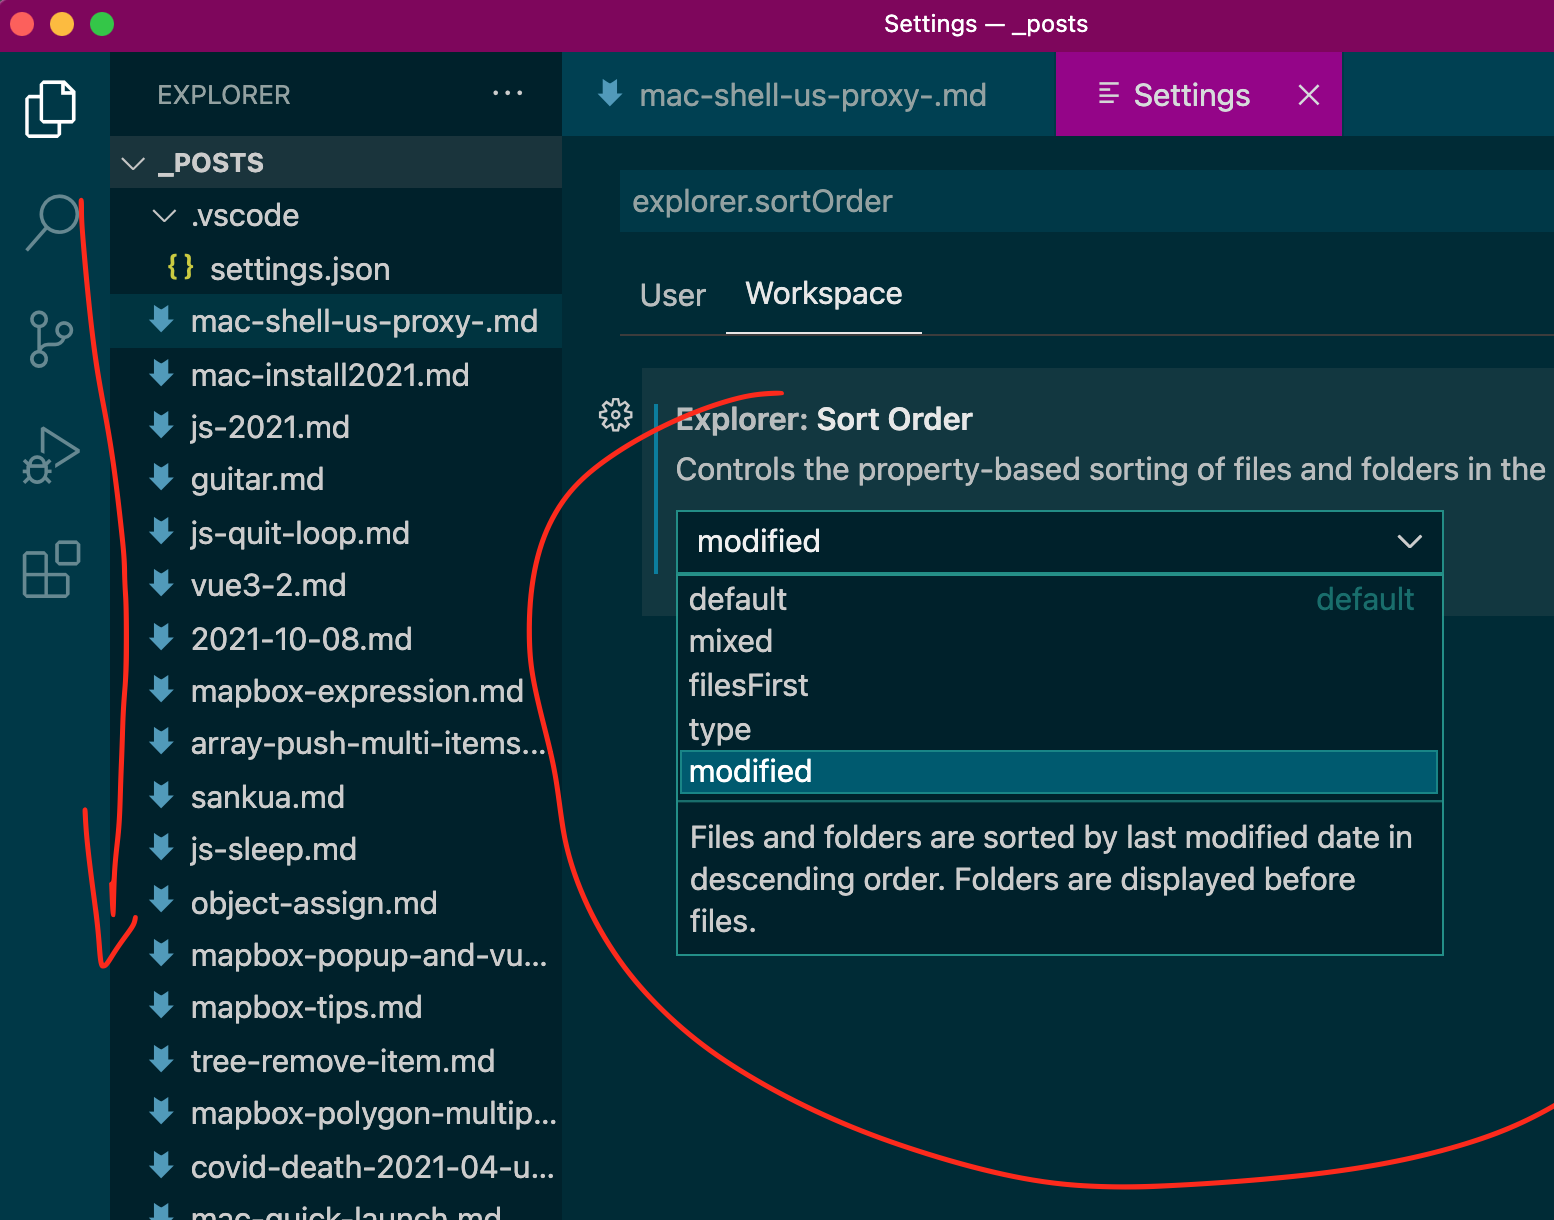
按修改时间排序

顺便修改 hexo butterfly 主题

在目录

themes/butterfly/source/css/_mode/

添加

gs.styl

默认是 1087(不是 1086 也不是 1089)

1
2
export http_proxy='http://127.0.0.1:1087'
export https_proxy=$http_proxy

测试地址

1
curl https://www.bbc.com/

写入 ~/.zshrc

1
alias p10='export http_proxy="http://127.0.0.1:1087";export https_proxy=$http_proxy;echo -e 已开启代理'

或者

1
2
3
4
5
6
7
8
9
10
11
function proxy(){
export http_proxy='http://127.0.0.1:1087'
export https_proxy=$http_proxy
echo " \e[41m 已开启代理"
}

function proxy_off(){
unset http_proxy
unset https_proxy
echo -e "已关闭代理"
}

注意 = 后面不能有空格!!!!

export http_proxy=这里不能有空格’http://127.0.0.1:1087'

shell 颜色语法

1
2
3
\e
\033
\x1B

tput 颜色

1
2
3
4
red=`tput setaf 1`
green=`tput setaf 2`
reset=`tput sgr0`
echo "${red}red text ${green}green text${reset}"
1
echo "$(tput setaf 1)Red text $(tput setab 7)and white background$(tput sgr 0)"

tput setab [1-7] # Set the background colour using ANSI escape
tput setaf [1-7] # Set the foreground colour using ANSI escape

Num Colour #define R G B

0 black COLOR_BLACK 0,0,0
1 red COLOR_RED 1,0,0
2 green COLOR_GREEN 0,1,0
3 yellow COLOR_YELLOW 1,1,0
4 blue COLOR_BLUE 0,0,1
5 magenta COLOR_MAGENTA 1,0,1
6 cyan COLOR_CYAN 0,1,1
7 white COLOR_WHITE 1,1,1

字符画

1
2
3
4
5
6
7
  ,--,   .-. .-. .---.    .---. .-. .-..-. .-.  .--.  .-. .-.  ,--,   
.' .' | | | |/ .-. ) ( .-._)| | | || | | | / /\ \ | \| |.' .'
| | __ | | | || | |(_)(_) \ | `-' || | | |/ /__\ \| | || | __
\ \ ( _)| | | || | | | _ \ \ | .-. || | | || __ || |\ |\ \ ( _)
\ `-) )| `-')|\ `-' /( `-' ) | | |)|| `-')|| | |)|| | |)| \ `-) )
)\____/ `---(_) )---' `----' /( (_)`---(_)|_| (_)/( (_) )\____/
(__) (_) (__) (__) (__)

vscode 命令行

Command+Shift+p 输入 shell

选择 install code command in path

在终端打开项目

1
code 目录名  

原理

其实是放了链接

1
/usr/local/bin

查看

1
which code

其他方式

1
open -a "Visual Studio Code"

vsode 根据项目修改颜色

https://dockyard.com/blog/2019/07/15/follow-these-steps-to-enable-vs-code-color-customization

编辑 .vscode/settings.json

1
2
3
4
5
6
7
8
9
10
{
"workbench.colorCustomizations": {
"titleBar.activeBackground": "#a8e6cf",
"titleBar.inactiveBackground": "#a8e6cf",
"titleBar.activeForeground": "#000",
"titleBar.inactiveForeground": "#000",
"statusBar.foreground": "#000",
"statusBar.background": "#a8e6cf"
}
}

加入 .gitignore

Open Terminal

Run touch ~/.gitignore_global to create a global .gitignore file in your home directory

Run open ~/.gitignore_global to open the file

Add .vscode/ to the file

Run git config –global core.excludesfile ~/.gitignore_global

1
sudo apachectl start
1
sudo apachectl stop

配置文件路径为 /etc/apache2/httpd.conf

站点的根目录为 /Library/WebServer/Documents/

修复 git

升级 mac monterey 以后 git 坏了

1
xcode-select --install

This will download and install the Command Line Tools package and fix the problem.

You do not need Xcode, you can install only the Command Line Tools here, it is about 130Mb.

If the above alone doesn’t do it, then also run:

xcode-select –reset

  • 按住 command 直接拖动
  • 拖出删除
  • 重新出现 一般在 Dock & Menu Bar 或者 软件自己的设置中

第三方 dozer 或者 Bartender

nodejs

官网

brew

https://brew.sh

官网因墙有问题

1
/bin/zsh -c "$(curl -fsSL https://gitee.com/cunkai/HomebrewCN/raw/master/Homebrew.sh)"

iterm

https://makeoptim.com/tool/terminal

注意:要下载字体,否则显示问号

sublime

如果是在默认shell下,

sudo ln -s “/Applications/Sublime\ Text.app/Contents/SharedSupport/bin/subl” /usr/bin/subl

使用zsh的可以使用以下命令

alias subl=”‘/Applications/Sublime Text.app/Contents/SharedSupport/bin/subl’”
alias nano=”subl”
export EDITOR=”subl”

====

alias subl=”open -a Sublime\ Text\ 2”

保存后执行source ~/.bash_profile,然后就可以用subl打开文本了

js 异步

https://www.w3schools.com/js/js_async.asp

search()的参数是正则表达式,而indexOf()的参数只是普通的字符串。indexOf()是比search()更加底层的方法。

如果只是兑一个具体字符串来茶渣检索,那么使用indexOf()的系统资源消耗更小,效率更高;如果查找具有某些特征的字符串(例如查找以a开头,后面是数字的字符串),那么indexOf()就无能为力,必须要使用正则表达式和search()方法了。

大多是时候用indexOf()不是为了真的想知道子字符串的位置,而是想知道长字符串中有没有包含这个子字符串。若果返回索引为-1,那么说明没有,反之则有。

startsWith

startsWith endsWith includes

search find findIndex

includes

似乎比 indexOf 厉害一点

1
2
3
var arr = ['a','b', 'c', NaN];
console.log(arr.indexOf(NaN)) // -1
console.log(arr.includes(NaN)) // true
1
2
3
var arr = new Array(3);
console.log(arr.indexOf(undefined));//-1
console.log(arr.includes(undefined))//true

fill 的小问题

1
2
3
a = Array(10).fill({'hello':'goodbye'});
a[0].hello= 777
// 全部都会变
1
2
aa = Array(10).fill().map(k=>({hello:'world'}));
aa[0].hello= 777

// 只有第一个会变 // 以下皆是

1
aaa = Array.from({length:10},()=> ({'hello':'goodbye'}))
1
aaaa = [...new Array(10)].map(()=> ({'hello':'goodbye'}));

repeat

https://www.samanthaming.com/tidbits/22-2-ways-to-repeat-strings/

break

1
2
3
4
for(let i =0;i< 10;i++){
if(i>5)break
console.log(i)
}

find 或者 findIndex

  • ref 使用 aaa.value
  • reactive 类型是 object

ref 和 reactive 一个针对原始数据类型,而另一个用于对象,这两个API都是为了给JavaScript普通的数据类型赋予响应式特性(reactivity)。

  • reactive和ref都是用来定义响应式数据的,而reactive更推荐用来定义对象,ref更推荐定义基础数据类型,但是ref也可以定义数组和对象
  • 在访问数据的时候,ref需要使用.value,而reactive不需要
1
const dataAsRefs = toRefs(data);

步子比蛋大

1
2
3
4
5
6
7
8
9
10
11
12
13
14
15
16
<template>
<div>Hello, {{ name }}!</div>
<input v-model="name" />
<button :disabled="!isNamePresent" @click="submitName">Submit</button>
</template>

<script setup>
import { ref, computed } from 'vue'

const name = ref('')
const isNamePresent = computed(() => name.value.length > 0)

function submitName() {
console.log(name.value)
}
</script>

父子组件

子组件

1
2
3
4
5
6
7
8
9
10
11
12
13
14
15
<!-- Form.vue -->
<template>
<form @submit.prevent="submitHandler">
<label>Name
<input type="text" />
</label>
<button>Submit</button>
</form>
</template>

<script setup>
function submitHandler() {
// Do something
}
</script>

父组件

1
2
3
4
5
6
7
8
9
10
11
12
13
14
15
16
<!-- App.vue -->
<template>
<div>Hello, {{ name }}!</div>
<Form />
</template>

<script setup>
import { ref } from 'vue'
import Form from './components/Form.vue'

const name = ref('')

function submitForm() {
console.log(name.value)
}
</script>

defineProps 和 defineEmits

1
2
3
4
5
6
7
8
9
10
11
12
13
14
15
16
17
18
19
20
21
22
23
24
25
26
27
28
29
30
31
32
33
34
35
36
37
38
39
40
41
42
43
44
45
46
47
48
49
50
<!-- Form.vue -->
<template>
<form @submit.prevent="submitHandler">
<label>Name
<input v-model="name" type="text" />
</label>
<button>Submit</button>
</form>
</template>

<script setup>
import { computed } from 'vue'
const props = defineProps({
modelValue: {
type: String,
default: ''
}
})
const emit = defineEmits(['update:modelValue', 'submit']);

const name = computed({
get () {
return props.modelValue
},
set(val) {
emit('update:modelValue', val);
}
})

function submitHandler() {
emit('submit')
}
</script>

<!-- App.vue -->
<template>
<div>Hello, {{ name }}!</div>
<Form v-model="name" @submit="submitForm" />
</template>

<script setup>
import { ref } from 'vue'
import Form from './components/Form.vue'

const name = ref('')

function submitForm() {
console.log(name.value)
}
</script>

git pull是git fetch和git merge两个步骤的结合

vscode 的 sync 等于下面

1
2
git pull origin someBranch
git push origin someBranch

  • ~ 选择器的 相反的 “previous sibling” selector ?

几个思路:

1
2
3
4
5
6
7
8
9
10
11
12
13
/* default link color is blue */
.parent a {
color: blue;
}

/* prev siblings should be red */
.parent:hover a {
color: red;
}
.parent a:hover,
.parent a:hover ~ a {
color: blue;
}
1
2
3
4
5
6
7
<div class="parent">
<a href="#">link</a>
</div>

flex order 或者 row-reverse 。 DOM 在后但显示“在前”。

1
ul li:nth-child(-n+2)

via https://stackoverflow.com/questions/1817792/is-there-a-previous-sibling-selector

via https://coolcssanimation.com/how-to-trigger-a-css-animation-on-scroll/


IntersectionObserver 是否可见

1
2
3
4
5
6
7
8
9
10
11
12
13
var io = new IntersectionObserver(callback, option);

// 开始观察
io.observe(document.getElementById('example'));

// 停止观察
io.unobserve(element);

// 关闭观察器
io.disconnect();

io.observe(elementA);
io.observe(elementB);

lazy load

1
2
3
4
5
6
7
8
9
10
11
12
13
14
15
16
17
18
function query(selector) {
return Array.from(document.querySelectorAll(selector));
}

var observer = new IntersectionObserver(
function(changes) {
changes.forEach(function(change) {
var container = change.target;
var content = container.querySelector('template').content;
container.appendChild(content);
observer.unobserve(container);
});
}
);

query('.lazy-loaded').forEach(function (item) {
observer.observe(item);
});

无限滚动(infinite scroll)

1
2
3
4
5
6
7
8
9
10
11
12
var intersectionObserver = new IntersectionObserver(
function (entries) {
// 如果不可见,就返回
if (entries[0].intersectionRatio <= 0) return;
loadItems(10);
console.log('Loaded new items');
});

// 开始观察
intersectionObserver.observe(
document.querySelector('.scrollerFooter')
);

ResizeObserver

观测 resize

scrollIntoView 到中间

https://developer.mozilla.org/en-US/docs/Web/API/Element/scrollIntoView

scrollIntoView()

默认是

scrollIntoView(true)

也就是

scrollIntoView({block: “start”, inline: “nearest”})

false 是

scrollIntoView({block: “end”, inline: “nearest”})

参数

behavior Optional

Defines the transition animation. One of auto or smooth. Defaults to auto.

block Optional

Defines vertical alignment. One of start, center, end, or nearest. Defaults to start.

inline Optional

Defines horizontal alignment. One of start, center, end, or nearest. Defaults to nearest.

tab 尽量靠中间

1
2
3
4
5
6
7
obj.scrollIntoView(
{
behavior: 'smooth',
block: 'nearest',
inline: 'center'
}
)

16:9 固定比例的 iframe

1
2
3
4
5
6
7
8
9
10
11
12
13
14
15
16
17
.container {
position: relative;
overflow: hidden;
width: 100%;
padding-top: 56.25%; /* 16:9 Aspect Ratio (divide 9 by 16 = 0.5625) */
}

/* Then style the iframe to fit in the container div with full height and width */
.responsive-iframe {
position: absolute;
top: 0;
left: 0;
bottom: 0;
right: 0;
width: 100%;
height: 100%;
}

class add active

1
2
3
4
5
6
7
8
9
10
11
12
13
for (var i = 0; i < btns.length; i++) {
btns[i].addEventListener("click", function() {
var current = document.getElementsByClassName("active");

// If there's no active class
if (current.length > 0) {
current[0].className = current[0].className.replace(" active", "");
}

// Add the active class to the current/clicked button
this.className += " active";
});
}

Get Element in Iframe

1
2
3
var iframe = document.getElementById("myFrame");
var elmnt = iframe.contentWindow.document.getElementsByTagName("H1")[0];
elmnt.style.display = "none";

Media Queries with JavaScrip

1
2
3
4
5
6
7
8
9
10
11
function myFunction(x) {
if (x.matches) { // If media query matches
document.body.style.backgroundColor = "yellow";
} else {
document.body.style.backgroundColor = "pink";
}
}

var x = window.matchMedia("(max-width: 700px)")
myFunction(x) // Call listener function at run time
x.addListener(myFunction) // Attach listener function on state changes

1
2
3
4
5
6
7
8
9
10
11
12
13
14
15
16
17
18
<defs>
<linearGradient
id="grad1"
x1="0%"
y1="0%"
x2="100%"
y2="0%"
>
<stop
offset="0%"
style="stop-color:#8095F0;stop-opacity:1"
/>
<stop
offset="100%"
style="stop-color:#51FCB5;stop-opacity:1"
/>
</linearGradient>
</defs>

1
2
3
4
5
6
'fill-color': ['interpolate-hcl', ['linear'], ['feature-state', 'population'], 0, 'red', 1e6, 'blue']


for (const district of districts) {
map.setFeatureState({ source: 'mysource', sourceLayer: 'mysourcelayer', id: district.id }, { population: district.population});
}
1
2
3
4
5
6
'fill-color': ['match', ['get', 'id'],
1020, 'red',
1033, 'green',
1038, 'red',
1049, 'white',
// ...
1
2
3
4
5
6
7
8
"icon-image": [
"case",
["all", ["==", ["get", "matched"], "True"], ["!=", ["get", "vehicle"], ["get", "standstill_vehicle"]]],
"orangemarker",
["==", ["get", "matched"], "True"],
"greenmarker",
"redmarker",
]
1
2
3
4
5
this.map.setPaintProperty("somelayer", "fill-color",
["case",
["==", ["get", "some_prop"], someval], "#34c0dd",
"#499bbc"
]);
1
2
3
4
5
6
7
8
9
10
11
12
13
14
15
16
17
18
19
20
21
22
23
24
25
26
27
28
29
30
31
32
33
34
35
const layers = [{
id: 'countries',
type: 'fill',
source: 'countries',
paint: {
'fill-color': [
'match', ['get', 'filter_prop', ['global']],
'pop_est',
['step', ['get', 'pop_est'],
0, '#f8d5cc',
1000000, '#f4bfb6',
5000000, '#f1a8a5',
10000000, '#ee8f9a',
50000000, '#ec739b',
100000000, '#dd5ca8',
250000000, '#c44cc0',
500000000, '#9f43d7',
1000000000, '#6e40e6',
],
'gdp_md_est',
['step', ['get', 'gdp_md_est'],
0, '#f8d5cc',
1000, '#f4bfb6',
5000, '#f1a8a5',
10000, '#ee8f9a',
50000, '#ec739b',
100000, '#dd5ca8',
250000, '#c44cc0',
5000000, '#9f43d7',
10000000, '#6e40e6',
],
'#ffffff',
],
},
}];

以下这个未测试!

1
2
3
4
5
6
['step', ['zoom'],
['case', ['all', ['!', ['feature-state', 'hidden']], ['get', 'red'], 1, 0],
10,
['case', ['all', ['!', ['feature-state', 'hidden']], ['any', ['get', 'red'], ['get', 'green']], 1, 0],
15,
['case', [['!', ['feature-state', 'hidden']], 1, 0]],
1
2
3
4
5
6
7
8
9
10
11
12
13
14
map.addLayer({
id: "cluster-count",
type: "symbol",
source: "grundbuch",
filter: ["has", "point_count"],
layout: {
"text-field": "{point_count_abbreviated}",
"text-font": ["DIN Offc Pro Medium", "Arial Unicode MS Bold"],
"text-size": 12
},
paint: {
"text-color": "#ffffff"
}
});

1
2
3
4
5
6
7
8
9
10
11
12
13
14
15
16
17
18
19
20
21
22
23
24
25
"line-color": [
'case',
['boolean', ['feature-state', 'hover'], false],
'#c00',

[
'case',
['!=', ['get', 'color'], null],
['get', 'color'],
'#16e8e9'
]

],
````

###

test.map.showCollisionBoxes = true // 显示碰撞边界
test.map.showTileBoundaries = true // 显示tile边界
test.map.showOverdrawInspector = true

需要很习惯一段时间

### setFeatureState

if (quakeID) {
map.removeFeatureState({
source: “earthquakes”,
id: quakeID
});
}
map.setFeatureState({
source: ‘earthquakes’,
id: quakeID,
}, {
hover: true
});

1
2


map.addLayer({
‘id’: ‘earthquakes-viz’,
‘type’: ‘circle’,
‘source’: ‘earthquakes’,
‘paint’: {
// The feature-state dependent circle-radius expression will render
// the radius size according to its magnitude when
// a feature’s hover state is set to true
‘circle-radius’: [
‘case’,
[‘boolean’,
[‘feature-state’, ‘hover’],
false
],
[
‘interpolate’, [‘linear’],
[‘get’, ‘mag’],
1, 8,
1.5, 10,
2, 12,
2.5, 14,
3, 16,
3.5, 18,
4.5, 20,
6.5, 22,
8.5, 24,
10.5, 26
],
5
],
‘circle-stroke-color’: ‘#000’,
‘circle-stroke-width’: 1,
// The feature-state dependent circle-color expression will render
// the color according to its magnitude when
// a feature’s hover state is set to true
‘circle-color’: [
‘case’,
[‘boolean’,
[‘feature-state’, ‘hover’],
false
],
[
‘interpolate’, [‘linear’],
[‘get’, ‘mag’],
1, ‘#fff7ec’,
1.5, ‘#fee8c8’,
2, ‘#fdd49e’,
2.5, ‘#fdbb84’,
3, ‘#fc8d59’,
3.5, ‘#ef6548’,
4.5, ‘#d7301f’,
6.5, ‘#b30000’,
8.5, ‘#7f0000’,
10.5, ‘#000’
],
‘#000’
]
}
});

````

via https://docs.mapbox.com/help/tutorials/create-interactive-hover-effects-with-mapbox-gl-js/

examples

var aa = { “type”: “Polygon”,
“coordinates”: [
[
[100.0, 0.0], [101.0, 0.0], [101.0, 1.0], [100.0, 1.0], [100.0, 0.0] ]
]
}

var aa = { “type”: “Polygon”,
“coordinates”: [
[ [100.0, 0.0], [101.0, 0.0], [101.0, 1.0], [100.0, 1.0], [100.0, 0.0] ],
[ [100.2, 0.2], [100.8, 0.2], [100.8, 0.8], [100.2, 0.8], [100.2, 0.2] ]
]
}

test.map.getSource(‘temp_line’).setData(aa)

{
type:’FeatureCollection’,
features:[
{
“geometry”: {
“type”: “MultiPoint”,
“coordinates”: [
[
108.91373500227928,
34.241324229728534
],
]
},
“type”: “Feature”,

}
]
}

1
Array.prototype.push.apply(a, [1,2]))

a.push(1, 2, 3);

1
2
3
4
var arr = [1];
var newItems = [2, 3];
arr.push(...newItems);
console.log(arr);

思路如下(console中有三个数据)

  • 后台请求(adss类型的)物理光缆 wlgl
  • 获得(界面中)铁路数据 railway
  • 计算 railway 和 wlgl 交叉点
  • groupBy 业务光缆,items push 所有点。然后去重为 items2